Selasa, 19 Desember 2017

Setting LCD display 16x2 di Raspberry PI

 The Raspberry Pi LCD 16×2 Circuit

It may look like that there is quite a bit to this circuit but basically it just involves connecting the wires up correctly to and from the display.
The potentiometer that’s in the circuit is pretty important for controlling the screen brightness. If you do not have one, then you can try swapping this out for a resistor. If you do use a normal resistor try using anything between 5k and 10k ohms. You may need to try out a few different values before getting the perfect resistance.
A typical 16×2 LCD display has 16 pins but not all of them need to be used. In this circuit we will only need to use 4 of the data bus lines since we’re only going to use it in 4 bit mode.
You will find that most 16 connector displays will be using a HD44780 controller. This makes the display pretty versatile and can be used across a wide range of devices. For example, this display I have used previously in an LCD tutorial for the Arduino.
The typical pin layout of the LCD board can be found below.
LCD 16x2 Display Datasheet

 Assembling the 16×2 LCD

You will find that most 16×2 displays do not come with the header pins pre-soldered. This means you will need to solder some header pins on before you can use it. It’s extremely hard getting a good connection to the screen without them. This is a pretty straightforward task and should only take a few minutes for anyone who has soldered before.
1. First snap the header pins so you have 1 line of 16.
2. Place the header pins up through the holes of the display. The short side of the header pins should stick up.
3. Now using a hot soldering iron and some solder, slowly solder each of the pins.
4. It’s now ready for use.
LCD 16x2 Display Solder

 Connecting Everything Up

Connecting the 16×2 LCD display to the Raspberry Pi is pretty straight forward.  There will be quite a few wires to connect up but there isn’t anything overly complex.
There is one thing that you should be aware of before you jump in and start assembling the circuit. Since we do not want 5v feeding back into the Pi (Pi’s GPIO pins are rated 3v3) we will need to make the read/write pin of the LCD go to ground.
In the steps below the physical/logical numbering of the pins are in the brackets otherwise it’s the GPIO numbering.
1. Place a wire from 5v (Pin 2) to the positive rail on the breadboard.
2. Place a wire from ground (pin 6) to the ground rail on the breadboard.
3. Place the 16×2 display onto the breadboard.
4. Place the potentiometer onto the breadboard.
 Connect the positive and ground pins to the relevant rails on the breadboard.
Starting from pin 1 of the LCD display do the following or simply refer to the circuit diagram below. Pin 1 of the screen is the pin closest to two edges of the board.
1. Pin 1 (Ground) goes to the ground rail.
2. Pin 2 (VCC/5v) goes to the positive rail.
3. Pin 3 (V0) goes to the middle wire of the potentiometer.
4. Pin 4 (RS) goes to GPIO25 (Pin 22)
5. Pin 5 (RW) goes to the ground rail.
6. Pin 6 (EN) goes to GPIO24 (Pin 18)
7. Pin 11 (D4) goes to GPIO23 (Pin 16)
8. Pin 12 (D5) goes to GPIO17 (Pin 11)
9. Pin 13 (D6) goes to GPIO18 (Pin 12)
10. Pin 14 (D7) goes to GPIO22 (Pin 15)
11. Pin 15 (LED +) goes to the positive rail.
12. Pin 16 (LED -) goes to the ground rail.


That’s all you need to do, the screen should now be able to turn on and communicate with the Raspberry Pi without any issues. If you’re having trouble refer to the circuit diagram below.
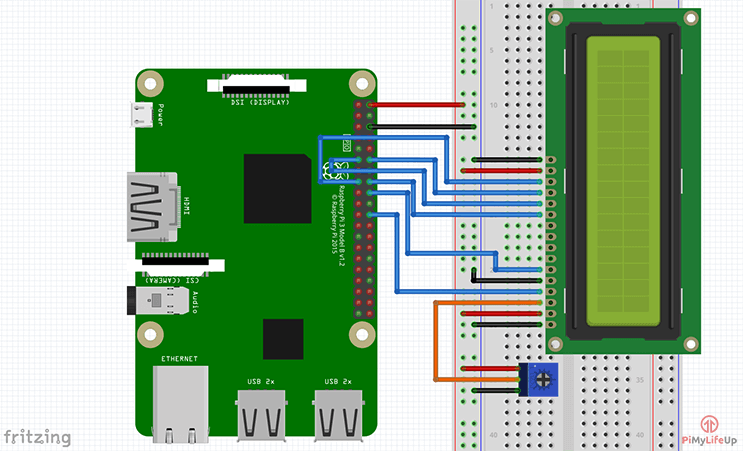
Raspberry Pi LCD 16x2 Circuit Diagram

 Code to communicate with the 16×2 Display

On the latest version of Raspbian all the required packages are pre-installed for communicating with GPIO devices. You should also find that python is already installed. If you’re running an older version of Raspbian than it might be worth checking out more information on setting up the Pi for GPIO usage.

 Required Library

In this example I am going to install and use the library from Adafruit. It’s designed for Adafruit LCD boards but will also work with other brands as well. If your display board uses a HD44780 controller then it should work with no issues at all.
First clone the required git directory to the Raspberry Pi by running the following command.
git clone https://github.com/adafruit/Adafruit_Python_CharLCD.git
Next change into the directory we just cloned  and run  the setup file.
cd ./Adafruit_Python_CharLCD
sudo python setup.py install
Once it’s done installing you can now call the Adafruit library in any python script on the Pi. To include it just add the following line at the top of the python script. You can then initialize the board and perform actions with it.
import Adafruit_CharLCD as LCD

 Communicating with the Display

Communicating with the Raspberry Pi LCD 16×2 display is very easy thanks to the library provided by Adafruit. It makes it incredibly easy to write Python scripts to setup and alter the display.
In the folder that we just downloaded there are a few examples of how to use the LCD library. It’s important that before you run any of these examples that you update the pin variables at the top of the file. If you followed my circuit the values below are the correct ones.
lcd_rs        = 25 
lcd_en        = 24
lcd_d4        = 23
lcd_d5        = 17
lcd_d6        = 18
lcd_d7        = 22
lcd_backlight = 4
lcd_columns = 16
lcd_rows = 2
If you want to check out one of the examples simply open up the file by entering the following.
cd ~/Adafruit_Python_CharLCD/examples/
sudo nano char_lcd.py
In here update the pin configuration values to the ones listed above. Once done simply exit by pressing CTRL X then Y.
Now to run this code simply enter python followed by the file name (including the extension).
python char_lcd.py

 Functions & Python Code

I will go through some of the most important methods that you will need to know about interacting with the screen using Python.
To initialize the pins, you will need to call the following class. Make sure all the variables that are being passed as parameters are defined before calling the class.
lcd = LCD.Adafruit_CharLCD(lcd_rs, lcd_en, lcd_d4, lcd_d5, lcd_d6, lcd_d7, lcd_columns, lcd_rows, lcd_backlight)
Once that’s done you can then change the display to however you need it. I will quickly go through some of the methods that are available to you using the Adafruit library.
home() – This method will move the cursor back to home which is the first column on the first line.
clear() – This method clears the LCD so that it’s completely blank.
set_cursor(col, row) – This method will move the cursor to a specific position. You specify the position by passing the column and row numbers as parameters. Eg. set_cursor(1,4)
enable_display(enable) – This enables or disables the display. Set it to true to enable it.
show_cursor(show) – This either shows or hides the cursor. Set it to true if you want the cursor to be displayed.
blink(blink) – Turns on or off a blinking cursor. Again set this to true if you want the cursor to be blinking.
move_left() or move_right() – Moves the cursor either left or right by one position.
set_right_to_left() or set_left_to_right() – Sets the cursor direction either left to right or right to left.
autoscroll(autoscroll) – If autoscroll is set to true then the text will right justify from the cursor. If set to false it will left justify the text.
message(text) – Simply writes text to the display. You can also include new lines (\n) in your message.
Cayenne Large
There are a few more methods available but it’s unlikely that you will need to use them. If you want to find all the methods that are available then simply open up the Ardafruit_CharLCD.py file located within the Adafruit_CharLCD folder, this can be found in the Adafruit_Python_CharLCD folder.
sudo nano ~/Adafruit_Python_CharLCD/Adafruit_CharLCD/Ardafruit_CharLCD.py
Below is a very simple script that I have put together that allows the user to input text that is then displayed on the screen.
#!/usr/bin/python
# Example using a character LCD connected to a Raspberry Pi
import time
import Adafruit_CharLCD as LCD

# Raspberry Pi pin setup
lcd_rs = 25
lcd_en = 24
lcd_d4 = 23
lcd_d5 = 17
lcd_d6 = 18
lcd_d7 = 22
lcd_backlight = 2

# Define LCD column and row size for 16x2 LCD.
lcd_columns = 16
lcd_rows = 2

lcd = LCD.Adafruit_CharLCD(lcd_rs, lcd_en, lcd_d4, lcd_d5, lcd_d6, lcd_d7, lcd_columns, lcd_rows, lcd_backlight)

lcd.message('Hello\nworld!')
# Wait 5 seconds

time.sleep(5.0)
lcd.clear()
text = raw_input("Type Something to be displayed: ")
lcd.message(text)

# Wait 5 seconds
time.sleep(5.0)
lcd.clear()
lcd.message('Goodbye\nWorld!')

time.sleep(5.0)
lcd.clear()
If the display isn’t showing anything when your python script is running, then it’s likely the pins defined in your script are wrong. Double check these and also double check the connections on the breadboard.
16x2 Display Setup


Sabtu, 04 November 2017

Konfigurasi LCD+I2C di Raspberry PI

Buka terminal lalu  masukkan perintah sudo raspi-config
  1. Pilih Interfaces Options
  2. Pilih I2C
  3. Pilih Select 
  4. Finish
  5. sudo apt-get install i2c-tools
  6. sudo apt-get install python-smbus
  7. sudo reboot
coding pythonnya :

import smbus
from time import *
# LCD Address
ADDRESS = 0x27
# commands
LCD_CLEARDISPLAY = 0x01
LCD_RETURNHOME = 0x02
LCD_ENTRYMODESET = 0x04
LCD_DISPLAYCONTROL = 0x08
LCD_CURSORSHIFT = 0x10
LCD_FUNCTIONSET = 0x20
LCD_SETCGRAMADDR = 0x40
LCD_SETDDRAMADDR = 0x80
# flags for display entry mode
LCD_ENTRYRIGHT = 0x00
LCD_ENTRYLEFT = 0x02
LCD_ENTRYSHIFTINCREMENT = 0x01
LCD_ENTRYSHIFTDECREMENT = 0x00
# flags for display on/off control
LCD_DISPLAYON = 0x04
LCD_DISPLAYOFF = 0x00
LCD_CURSORON = 0x02
LCD_CURSOROFF = 0x00
LCD_BLINKON = 0x01
LCD_BLINKOFF = 0x00
# flags for display/cursor shift
LCD_DISPLAYMOVE = 0x08
LCD_CURSORMOVE = 0x00
LCD_MOVERIGHT = 0x04
LCD_MOVELEFT = 0x00
# flags for function set
LCD_8BITMODE = 0x10
LCD_4BITMODE = 0x00
LCD_2LINE = 0x08
LCD_1LINE = 0x00
LCD_5x10DOTS = 0x04
LCD_5x8DOTS = 0x00
# flags for backlight control
LCD_BACKLIGHT = 0x08
LCD_NOBACKLIGHT = 0x00
En = 0b00000100 # Enable bit
Rw = 0b00000010 # Read/Write bit
Rs = 0b00000001 # Register select bit
class i2c_device:
   def __init__(self, addr, port=1):
      self.addr = addr
      self.bus = smbus.SMBus(port)
# Write a single command
   def write_cmd(self, cmd):
      self.bus.write_byte(self.addr, cmd)
      sleep(0.0001)
class lcd:
   #initializes objects and lcd
   def __init__(self):
      self.lcd_device = i2c_device(ADDRESS)
      self.lcd_write(0x03)
      self.lcd_write(0x03)
      self.lcd_write(0x03)
      self.lcd_write(0x02)
      self.lcd_write(LCD_FUNCTIONSET | LCD_2LINE | LCD_5x8DOTS | LCD_4BITMODE)
      self.lcd_write(LCD_DISPLAYCONTROL | LCD_DISPLAYON)
      self.lcd_write(LCD_CLEARDISPLAY)
      self.lcd_write(LCD_ENTRYMODESET | LCD_ENTRYLEFT)
      sleep(0.2)
   # clocks EN to latch command
   def lcd_strobe(self, data):
      self.lcd_device.write_cmd(data | En | LCD_BACKLIGHT)
      sleep(.0005)
      self.lcd_device.write_cmd(((data & ~En) | LCD_BACKLIGHT))
      sleep(.0001)
   def lcd_write_four_bits(self, data):
      self.lcd_device.write_cmd(data | LCD_BACKLIGHT)
      self.lcd_strobe(data)
   # write a command to lcd
   def lcd_write(self, cmd, mode=0):
      self.lcd_write_four_bits(mode | (cmd & 0xF0))
      self.lcd_write_four_bits(mode | ((cmd << 4) & 0xF0))
   # put string function
   def lcd_display_string(self, string, line):
      if line == 1:
         self.lcd_write(0x80)
      if line == 2:
         self.lcd_write(0xC0)
      if line == 3:
         self.lcd_write(0x94)
      if line == 4:
         self.lcd_write(0xD4)
      for char in string:
         self.lcd_write(ord(char), Rs)
   # clear lcd and set to home
   def lcd_clear(self):
      self.lcd_write(LCD_CLEARDISPLAY)
      self.lcd_write(LCD_RETURNHOME)
display = lcd()
display.lcd_display_string("   MONITORING   ", 1)
display.lcd_display_string("SUHU &KELEMBABAN", 2)

Coding python Keypad 4x4 di Raspberry Pi

import RPi.GPIO as GPIO

GPIO.setmode(GPIO.BOARD)
GPIO.setwarnings(False)

MATRIX = [ [1,2,3,'A'],
           [4,5,6,'B'],
           [7,8,9,'C'],
           ['*',0,'#','D'] ]

ROW = [7,11,13,15]
COL = [12,16,18,22]

for j in range(4):
    GPIO.setup(COL[j], GPIO.OUT)
    GPIO.output(COL[j], 1)

for i in range(4):
    GPIO.setup(ROW[i], GPIO.IN, pull_up_down = GPIO.PUD_UP)


try:
    while (True):
        for j in range(4):
            GPIO.output(COL[j],0)

            for i in range(4):
                    if GPIO.input(ROW[i]) == 0:
                        print MATRIX[i][j]
                        while GPIO.input(ROW[i]) == 0:
                                pass

            GPIO.output(COL[j],1)


except KeyboardInterrupt:
    GPIO.cleanup()
   

Sabtu, 09 September 2017

Cara membuat VPN-server di Raspberry PI (jaringan local)

Ringkasan ini tidak tersedia. Harap klik di sini untuk melihat postingan.

How to create Mail Server with Citadel in Raspberri PI

1. First let’s update our package repository by running the following command.

sudo apt-get update

2. Now run upgrade so that you’re updated and running on the latest packages.

sudo apt-get upgrade

3. It’s now time to start the installation process of Citadel, we can do that easily with the following command.

sudo apt-get install citadel-suite

4. For this screen, leave the field set to 0.0.0.0 as this allows Citadel to listen on all incoming addresses. The only reason to change this would be if you are running multiple instances of Citadel. Simply press enter to continue.
Configuring Raspberry Pi Email Server

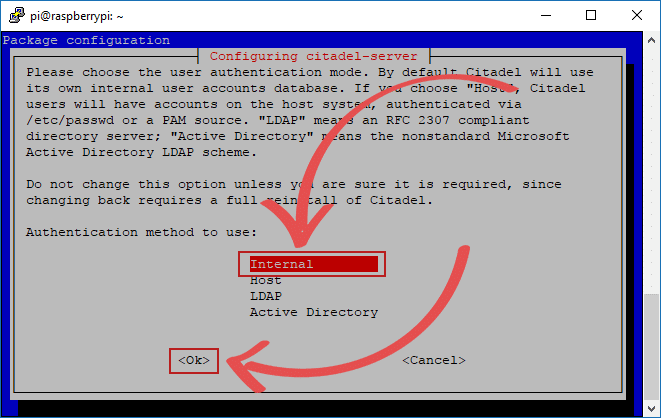
5. Now for the user authentication mode we’re going to keep this set to internal. This allows Citadel to utilize its own internal user accounts database. Only change this if you have a need for the other three options. Press Enter to continue.
Email Server Authentication Mode

6. Here we get to set the name that we want for the administrator user, to keep this tutorial as simple as possible we will be just utilizing the default username admin.

However, we recommend changing the username to something else since admin is usually really easy to guess and can lower the security of your server. Remember what you set here for later in the tutorial as this is what you will need to log into Citadels web interface.

Press enter once you’re happy with your choice.
Email Server select admins username

7. Now is the time to enter a password for the new administrator user, make sure you make this password difficult to guess.
A secure password is crucial as anyone who gains access to your admin account could view all your emails and potentially damage your server’s settings. It is even more crucial if you also plan on port forwarding port 80 to allow access to the web interface.
Press Enter once you’re happy with the password that you have entered.
You will next be asked to verify this password, enter the same password again and press enter.
Email Server Admin Password

8. For the purposes of this tutorial we will be selecting internal to make Webcit utilize its own HTTP server facilities. However, if you’re utilizing a Apache2 server already, then select Apache2.
Use the arrow keys to select Internal then press enter to continue.
Select Mail Web Server

9. Now it will prompt you to select the port that you want to listen for a HTTP connection on, if you have no other webservers running it’s safe to keep it set to 80. Otherwise try changing it to another port such as 8080. It’s also important to know that some ISPS block port 80 so you will need to select a different one anyway.
Press enter when you’re happy with your choice.
Select HTTP Port

10. Now it will prompt you to select the port that you want to listen for a HTTPS connection on, if you have no other webservers running it’s safe to keep it set to 443. Otherwise try changing it to another port such as 4434.
Press enter once you’re happy with your choice
Server Select HTTPS port

11. Now we can select whether we want to enforce a default language or let the user choose it on login. Easiest option is to just select “User Defined”.
When you’re happy with your choice, press enter.
Select Language

Extra Steps

Sometimes the steps above will throw errors and not create the admin account we need to setup the email server correctly. If this is the case with you then you will need to do a few extra steps.
1. First we need to create the netconfigs folder and set the owner and group to citadel.

sudo mkdir /etc/citadel/netconfigs
sudo chown citadel:citadel /etc/citadel/netconfigs

2. Next we need to restart Citadel so the previous changes are applied correctly. We also want to run setup again so that we can setup the admin account if it wasn’t created correctly the first time.

sudo service citadel restart
sudo /usr/lib/citadel-server/setup

3. When you run the setup it will take you through a series of questions with the first being the name of admin. Set this to the username you wish to have for your admin account.

4. Next it will ask you to set a password for the administrator account. Set this to something secure so you’re not easily hacked.

5 You can now skip through the rest of the questions. Simply press enter to skip the questions and not change anything.

Setting up the Citadel Email Server

1. Now we need to load up Citadels web interface, to do this go to your Raspberry Pi’s IP address in your favourite web browser. In my case, I would go to http://192.168.1.105/.
If you don’t have the Raspberry Pi’s IP address on hand then you can type hostname -I into the Raspberry Pi’s terminal to get your local IP address.
Login by using the admin username and the admin password you set during the installation process.
email Server Login

2. You should now be seeing the default dashboard, you can change the homepage by opening another page and clicking “Make this my start page” located in the top right hand corner. For now, just click on administration in the sidebar.
Raspberry Pi Citadel Dashboard

3. Now we are in the system administration menu, there’s a wide variety of different options in here but what we are after is “Edit site-wide configuration”, so click on that.
Citadel Admin Menu

4. Now on this screen we will have to make a few changes to get everything working. Here we need to change the “Fully Qualified Domain Name” to the custom domain we plan to use for our email. In our case, we will set this to mail.pimylifeup.com
Once done, click on the “SMTP” tab.
Pi Citadel General config

5. Now on this screen make note of the ports mentioned here, we will need to port forward these to allow the server to receive emails over SMTP. Once done, press the “Save Changes” button, then click on “Administration” in the sidebar.
email Server SMTP settings

6. Now back in the “System Administration Menu”, click on “Domain names and internet mail configuration”. This will take us to the menu that we will be using to add additional domain names to Citadel.
Citadel Admin Menu

7. Now on this screen, under “Local host aliases” type in the domain name you want to use then press the “Add” button. Once done, click back on “Administration” in the sidebar.
Citadel set Localhost aliases

8. Now we are back on this screen, we need to click “Restart Now” under “Shutdown Citadel” this ensures that all our settings changes will now be loaded in.
Citadel Email Server Restart now

Setting up DNS for your Raspberry Pi Email Server

The easiest way to setup your DNS is to utilize a service like Cloudflare. Cloudflare offers a stable and redundant DNS service that can also be easily setup to also act as a dynamic dns service which is incredibly useful for anyone that is behind a dynamic IP address.
An added advantage is that it also makes it incredibly easy to modify the DNS records, and updates are propagated much faster than most DNS services.
1. Go to your domain name on Cloudflare, then go to the DNS tab.

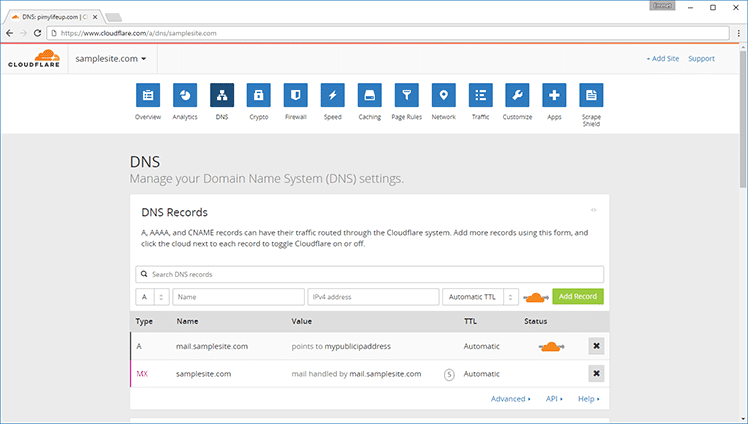
2. In here you need to add an A name record that points towards your network’s public IP address. This will allow you to access your webmail client after you port forward. It is also needed so we can point the MX Record to it.

3. Now add an MX record that points towards your domain name that you set up as an A record in the previous step.
Cloudflare email setup

4. With that all done, you will now need to port forward the various ports from earlier. If you didn’t make any changes then you will need to port forward the following ports 80, 25, 587 and 465. The last 3 of these ports should be your SMTP ports mentioned in the SMTP settings page from earlier.
If you’re unsure on how to portforward on your router, you can try following our generic port forwarding guide that you can find on this website. Otherwise look up your router at the port forward website.
Also, if you have a dynamic IP address you will need to setup a dynamic DNS client, you can follow our guide on setting this up. Make sure you follow the steps on setting it up to work through Cloudflare.

Setting up SpamAssassin for your Raspberry Pi Email Server

Now we will go through setting up Spamassassin, this is a tool that handles sifting through SPAM. It is a crucial tool to have installed on any private email server. It will add a bit more workload to the Raspberry Pi but it should be able to handle it just fine.

1. First let’s install Spamassassin from the official packages by running the following command. The installation process of Spamassassin can take some time as it has to compile several things.


sudo apt-get install spamassassin

2. After Spamassassin has installed, we now need to make some changes to its configuration, run the following command to edit the first configuration file.

sudo nano /etc/spamassassin/local.cf

3. Update the lines mentioned below so that they match what we have written, if any of these lines have a # in front of it, then remove it. We will explain what each line does and why you should enable them.
This line makes Spamassassin modify the subject header of spam e-mails to include SPAM and the spam score that the Spamassassin system has assigned to it.
rewrite_header Subject [***** SPAM _SCORE_ *****]
This line tells Spamassassin to only modify the headers of an email and not make any changes to the actual body.
report_safe 0
Setting the required score low means you will initially get lots of false positives, but it will help you teach Spamassassin to know what emails are good and what emails are bad.
required_score 2.0
This next line sets Spamassassin to use a Bayesian filter, Bayesian is a way of estimating the probability of whether an email is Spam or not. It is a commonly used method that improves as the sample size increases.
use_bayes 1
The following line turns on the automatic learning for the Bayesian filtering.
bayes_auto_learn 1
Once you’re all done, simply save and exit out of the file by pressing Ctrl+X and then Y and then pressing Enter.

4. Now there is one final file we need to edit to finish setting up Spamassassin, run the following command.

sudo nano /etc/default/spamassassin

The following line allows Spamassassin to work through systemctl, and means we can get it to boot at startup easily.
ENABLED=1
This line allows a cron job to automatically update the Spamassassin rules.
CRON=1
Saves and exit out of the file by pressing Ctrl+X and then Y.
5. We can now start the Spamassassin daemon with the following command.

sudo service spamassassin start

6. Now add Spamassassin to the init system with the following command so it automatically starts on boot.

sudo systemctl enable spamassassin

7. We now need to go to Citadels web interface and go back to the Administration screen.
Citadel Admin Dashboard

8. Once we are back in here, we need to go to “Domain names and Internet mail configuration”.
Citadel Admin Menu

9. Now that we are in here, we need to type in the IP address, 127.0.0.1 under “SpamAssassin Hosts”. Once you have typed it in, we can just press the “Add” button.
Ciatadel Add Spamassassin

Setting up ClamAV for Citadel

Now onto the final part of our Raspberry Pi email server installation guide, we are going to be setting up and installing the ClamAV software. This software will scan all your incoming emails for viruses and helps protect your Raspberry Pi from becoming infected.
1. Installing ClamAV is incredibly easy as it’s already included in the Debian packages, we can just run the following command to install it.

sudo apt-get install clamav

2. Now we want to get ClamAV to download the latest version of its virus databases, we can do this by running the following command.

sudo freshclam

You may run into the error below, but we can deal with that:
ERROR: /var/log/clamav/freshclam.log is locked by another process
To deal with this error, we need to stop clamav, we can do this by running the following command. Then run sudo freshclam again.

sudo service clamav-freshclam stop

3. After the update has completed, run the following command.

sudo service clamav-freshclam start

4. Now enable ClamAV with systemctl so its ensured to start on bootup.

sudo systemctl enable clamav-freshclam

5. We now need to go to Citadels web interface and go back to the Administration screen.
Raspberry Pi Citadel Dashboard

6. Once we are back in here, we need to go to “Domain names and Internet mail configuration”.
Citadel Admin Menu

7. Now that we are in here, we need to type in the IP Address, 127.0.0.1 under “ClamAV clamd hosts”. Once you have typed it in, we can just press the “Add” button.
Add Clamav
Hopefully by now you will have a fully functional email server that you’re able to successfully connect to.

Updating your User Account’s Email Address

If you need to update your user accounts email address then this can be found in the advanced menu when you’re logged into your chosen user.

1. Go to advanced and on this screen select “update your contact information”.
update contact information

2. Update your email address under “primary internet email address”, you can also update other things such as your display name and other email addresses you want connected to this account (Internet email alias).
update personal email address

3. Once you’re done select save changes.

Troubleshooting

There are quite a few issues that you might run into whilst doing this tutorial with some being an easy fix and others a bit more difficult.
  • Some ISPS will be blocking port 25 which means when you send emails they will fail. To get around this you will need to either get the port unblocked or setup citadel to use the ISP’s SMTP server. You can find more information on outbound email being stuck here.
  • If you’re not receiving email then this likely means your DNS has not been configured correctly. Go back to where your DNS is being managed and review the information.