Kamis, 29 November 2018
Judul Skripsi/TA/Project Menggunakn Raspberry PI
1.RF-ID Pengamanan Pintu Rumah
2. RF-ID Pengamanan Produk
3. RF-ID Identifikasi Nomer Keanggotaan
4. Opencv Template Matching
5. Pengendali Alat Listrik
6. Penjadwalaan Lampu dan Alat Listrik
7. Network Monitoring
8. Small IDS Control
9. Home Internet Access Control
10. Kontrol & Monitoring Level Air Menggungkan Bot Telegram pada Rumah Berbasis Raspberry PI
11. Sistem Pendeteksi Slot Parkir Berbasis Raspberry Dengan Notifikasi Telegram
Sabtu, 10 November 2018
Code sensor Ultrasonic
import RPi.GPIO
as GPIO #Import GPIO
library
import time #Import time library
GPIO.setmode(GPIO.BCM) #Set GPIO pin numbering
GPIO.setwarnings(False)
TRIG = 23 #Associate pin 23 to TRIG
ECHO = 24 #Associate pin 24 to ECHO
print "Distance measurement in progress"
GPIO.setup(TRIG,GPIO.OUT) #Set pin as GPIO out
GPIO.setup(ECHO,GPIO.IN) #Set pin as GPIO in
while True:
GPIO.output(TRIG, False) #Set TRIG as LOW
#print "Waitng For Sensor To Settle"
time.sleep(2) #Delay of 2 seconds
GPIO.output(TRIG, True) #Set TRIG as HIGH
time.sleep(0.00001) #Delay of 0.00001 seconds
GPIO.output(TRIG, False) #Set TRIG as LOW
while GPIO.input(ECHO)==0: #Check whether the ECHO is LOW
pulse_start = time.time() #Saves the last known time of LOW pulse
while GPIO.input(ECHO)==1: #Check whether the ECHO is HIGH
pulse_end = time.time() #Saves the last known time of HIGH pulse
pulse_duration = pulse_end - pulse_start #Get pulse duration to a variable
distance = pulse_duration * 17150 #Multiply pulse duration by 17150 to get distance
distance = round(distance, 2) #Round to two decimal points
if distance > 2 and distance < 400: #Check whether the distance is within range
print "Distance:",distance - 0.5,"cm" #Print distance with 0.5 cm calibration
else:
print "Out Of Range" #display out of range
MENGGUNAKAN 2 ULTRASONIC
import
serial
from time import gmtime, strftime
from random import randint
import RPi.GPIO as GPIO #Import GPIO library
import time #Import time library
GPIO.setmode(GPIO.BCM) #Set GPIO pin numbering
import MySQLdb
GPIO.setwarnings(False)
TRIG = 23 #Associate pin 23 to TRIG
ECHO = 24 #Associate pin 24 to ECHO
TRIG1 = 18 #Associate pin 23 to TRIG
ECHO2 = 27
db = MySQLdb.connect("localhost","root","12345","db_pemesanan_parkir")
cursor = db.cursor()
st=0
st2=0
print "Distance measurement in progress"
GPIO.setup(TRIG,GPIO.OUT) #Set pin as GPIO out
GPIO.setup(ECHO,GPIO.IN) #Set pin as GPIO in
GPIO.setup(TRIG1,GPIO.OUT) #Set pin as GPIO out
GPIO.setup(ECHO2,GPIO.IN) #Set pin as GPIO in
while True:
GPIO.output(TRIG, False) #Set TRIG as LOW
#print "Waitng For Sensor To Settle"
time.sleep(1) #Delay of 2 seconds
GPIO.output(TRIG, True) #Set TRIG as HIGH
time.sleep(0.00001) #Delay of 0.00001 seconds
GPIO.output(TRIG, False) #Set TRIG as LOW
while GPIO.input(ECHO)==0: #Check whether the ECHO is LOW
pulse_start = time.time() #Saves the last known time of LOW pulse
while GPIO.input(ECHO)==1: #Check whether the ECHO is HIGH
pulse_end = time.time() #Saves the last known time of HIGH pulse
pulse_duration = pulse_end - pulse_start #Get pulse duration to a variable
distance = pulse_duration * 17150 #Multiply pulse duration by 17150 to get distance
distance = round(distance, 2) #Round to two decimal points
R=distance - 0.5
if R > 2 and R < 5 and st<1: #Check whether the distance is within range
st=1
print "TERISI:",R,"cm" #Print distance with 0.5 cm calibration
tgl=strftime("%Y-%m-%d", gmtime())
jam=strftime("%H:%M:%S", gmtime())
ket=str(R)
area="IA"
status="TERISI"
sql ="UPDATE `tb_parkir` set `tanggal`='%s', `jam`='%s', `area`='%s', `status`='%s', `keterangan`='%s' where kode_parkir='PKR1707001'" % (tgl,jam,area,status,ket)
#print (sql)
try:
cursor.execute(sql)
db.commit()
except:
db.rollback()
if R> 5 and st>0:
print "KOSONG:" ,R,"cm" #display out of range
st=0
tgl=strftime("%Y-%m-%d", gmtime())
jam=strftime("%H:%M:%S", gmtime())
ket=str(R)
area="IA"
status="KOSONG"
sql ="UPDATE `tb_parkir` set `tanggal`='%s', `jam`='%s', `area`='%s', `status`='%s', `keterangan`='%s' where kode_parkir='PKR1707001'" % (tgl,jam,area,status,ket)
#print (sql)
try:
cursor.execute(sql)
db.commit()
except:
db.rollback()
GPIO.output(TRIG1, False) #Set TRIG as LOW
#print "Waitng For Sensor To Settle"
time.sleep(1) #Delay of 2 seconds
GPIO.output(TRIG1, True) #Set TRIG as HIGH
time.sleep(0.00001) #Delay of 0.00001 seconds
GPIO.output(TRIG1, False) #Set TRIG as LOW
while GPIO.input(ECHO2)==0: #Check whether the ECHO is LOW
pulse_start = time.time() #Saves the last known time of LOW pulse
while GPIO.input(ECHO2)==1: #Check whether the ECHO is HIGH
pulse_end = time.time() #Saves the last known time of HIGH pulse
pulse_duration = pulse_end - pulse_start #Get pulse duration to a variable
distance = pulse_duration * 17150 #Multiply pulse duration by 17150 to get distance
distance = round(distance, 2) #Round to two decimal points
R=distance - 0.5
if R > 2 and R < 5 and st2<1: #Check whether the distance is within range
st2=1
print "ADA:",R,"cm" #Print distance with 0.5 cm calibration
tgl=strftime("%Y-%m-%d", gmtime())
jam=strftime("%H:%M:%S", gmtime())
ket=str(R)
area="BI"
status="ADA"
#sql ="INSERT INTO `tb_parkir` (`tanggal`, `jam`, `area`, `status`, `keterangan`) VALUES ('%s', '%s', '%s', '%s', '%s') " % (tgl,jam,area,status,ket)
sql ="UPDATE `tb_parkir` set `tanggal`='%s', `jam`='%s', `area`='%s', `status`='%s', `keterangan`='%s' where kode_parkir='PKR1707002'" % (tgl,jam,area,status,ket)
#print (sql)
try:
cursor.execute(sql)
db.commit()
except:
db.rollback()
if R> 5 and st2>0:
print "TIDAK ADA:" ,R,"cm" #display out of range
st2=0
tgl=strftime("%Y-%m-%d", gmtime())
jam=strftime("%H:%M:%S", gmtime())
ket=str(R)
area="IB"
status="TIDAK ADA"
sql ="UPDATE `tb_parkir` set `tanggal`='%s', `jam`='%s', `area`='%s', `status`='%s', `keterangan`='%s' where kode_parkir='PKR1707002'" % (tgl,jam,area,status,ket)
#print (sql)
try:
cursor.execute(sql)
db.commit()
except:
db.rollback()
Jumat, 02 Maret 2018
Install VNC Server in Raspberry PI
Setting up your Raspberry Pi
VNC Connect is included with Raspbian but you still have to enable it.
First, run the following commands to make sure you have the latest version of VNC Server and VNC Viewer:
sudo apt-get update sudo apt-get install realvnc-vnc-server sudo apt-get install realvnc-vnc-viewer
If you’re already using an older version of VNC Server, restart it. If not, and you’re already booted into the PIXEL desktop, select Menu > Preferences > Raspberry Pi Configuration > Interfaces and make sure VNC is set to Enabled.
Alternatively, run the command
sudo raspi-config, navigate to Advanced Options > VNC and select Yes.Jumat, 12 Januari 2018
Konfigurasi Sensor Vibration on Rapberry PI
SCHEMATIC:

Python Code:
#!/usr/bin/python
import RPi.GPIO as GPIO
import time
#GPIO SETUP
channel = 17
GPIO.setmode(GPIO.BCM)
GPIO.setup(channel, GPIO.IN)
def callback(channel):
if GPIO.input(channel):
print "Gerakan Terdeteksi!"
else:
print "Gerakan Terdeteksi!"
GPIO.add_event_detect(channel, GPIO.BOTH, bouncetime=300) # let us know when the pin goes HIGH or LOW
GPIO.add_event_callback(channel, callback) # assign function to GPIO PIN, Run function on change
# infinite loop
while True:
time.sleep(1)
reff : http://www.piddlerintheroot.com/vibration-sensor/
Konfigurasi Sensor PIR on Rapberry PI
How it Works
PIR (passive infrared) motion sensor detects any movement of objects, human or animals. Mostly they are used in automatically activated lighting and burglar alarm systems.
Every object with temperature above absolute zero emit heat in the form of infrared radiation. PIR motion sensor detects change in the infrared radiation impinging on it. When any object or human passes in the front of the PIR sensor, the temperature in sensor’s field of view will rise from ambient temperature to object temperature and then back again to ambient temperature. PIR sensor converts this temperature change into the change in output voltage and that change in voltage is considered as motion detected.
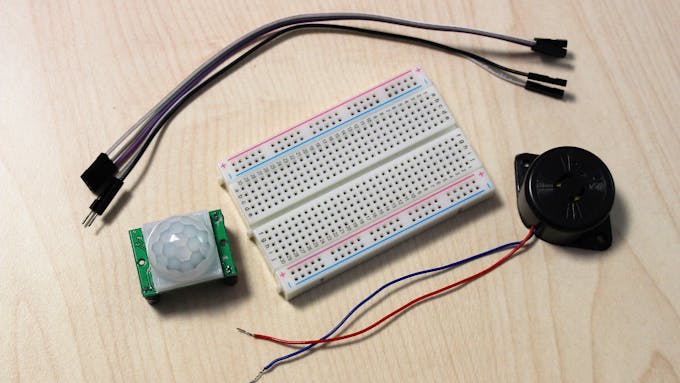
Components
PIR Sensor

1 / 2 • PIR Sensor

PIR Sensor
Sensor
Sensor has three pins. Power (VCC), Ground (GND) and output (OUT) pin which gives logic high if motion is detected. It has two potentiometers. One for sensitivity adjustment and second for adjusting the time the output signal stays high when motion is detected.

VCC, OUT and GND pins

Potentiometers to adjust Sensitivity and Output Time

Python Code :
import RPi.GPIO as GPIO
import time
GPIO.setmode(GPIO.BCM)
GPIO.setup(23, GPIO.IN) #PIR
GPIO.setup(24, GPIO.OUT) #BUzzer
try:
time.sleep(2) # to stabilize sensor
while True:
if GPIO.input(23):
GPIO.output(24, True)
time.sleep(0.5) #Buzzer turns on for 0.5 sec
GPIO.output(24, False)
print("Motion Detected...")
time.sleep(5) #to avoid multiple detection
time.sleep(0.1) #loop delay, should be less than detection delay
except:
GPIO.cleanup()
Selasa, 19 Desember 2017
Setting DHT22 & LCD 16x2 di Raspberry PI
Raspberry PI DHT22 humidity sensor with a LCD 16×2 display – Weather station
For a workshop I’m going to give about Raspberry PI and how to interact with the outside world, I thought for a start, why not something simple like some kind of a Weather Station.
Materials
1x Raspberry PI (I’m using b+)
1x LCD 16×2
1x DHT22 (or DHT11 or am2303) sensor
1x 10K potentiometer
1x 10K resistor
1x breadboard
Here’s the schematic in Fritzing

Connections
| Sensor | Arduino PINs | ||
| LCD display | Board | BCM | |
| 1 | GND | ||
| 2 | 5v | ||
| 3 | Potentiometer | ||
| 4 | 7 | GPIO27 | |
| 5 | GND | ||
| 6 | 9 | GPIO22 | |
| 7 | |||
| 8 | |||
| 9 | |||
| 10 | |||
| 11 | 22 | GPIO25 | |
| 12 | 18 | GPIO24 | |
| 13 | 16 | GPIO23 | |
| 14 | 12 | GPIO18 | |
| 15 | 5v | ||
| 16 | 7 | GPIO4 | |
| DHT22 | |||
| 8 | GPIO14 | ||
| GND | |||
| 5v | |||
After the wiring, time to connect the PI
Note: Using this wiring and the Adafruit’s LCD libraries, the LCD display will not light up when connecting the PI. After testing the example and running the python script, the LCD will light up and start displaying information
Software
DHT

For the sensor to work, we need the DHT libraries developed by Adafruit and setup the environment.
NOTE: As stated by Adafruit, this driver is work in progress
First, set up your development environment
Now, clone the Adafruit libraries
After cloned, enter the directory
Install the libraries
Everything now should be installed. Let’s try the sensor
Now, execute the test file without arguments to see the options available
We’re using DHT22 and connected to the GPIO PIN 4, so, our command line will be:
And the result:
LCD 16×2

With this method, we’re not going to use i2c or UART, but Adafruit’s libraries for LCD. They are easy to install and easy to work with.
Note: If you just want to connect the LCD, refere to this post.
Install the necessary packages
Upgrade distribute
Use PIP to install the GPIO packages
Install the necessary software modules
Try with an example
Now, you can see information on the LCD display
If you want to check the API of the LCD Adafruit’s Python Library:
The Code
The final product

Langganan:
Komentar (Atom)